Wholesome Whole Wheat Bread: Easy, Nourishing, and Delicious!
Craving homemade goodness? Bake Whole Wheat Bread - Healthy & Easy with my simple recipe! Your kitchen will smell amazing, plus it's so nourishing.

- The Joy of Baking: My Love for Whole Wheat Bread
- A Slice of History: Where It All Began
- Why You’ll Love This Recipe
- Perfect for Any Occasion
- Essential Ingredients Guide for Baking Whole Wheat Bread
- Mastering the Art of Professional Cooking
- Bake Whole Wheat Bread - Healthy & Easy: Additional Recipe Information
- Recipe Card
The Joy of Baking: My Love for Whole Wheat Bread
Oh my gosh, let me tell you about the first time i ever tried to bake whole wheat bread - healthy & easy .
It was one of those rainy saturdays where you just want to cozy up at home. i rummaged through my kitchen cabinets and decided to play baker for a day.
It felt like a scene out of a feel-good movie—sunbeam streaming in, a bit of flour on my cheek, and that irresistible smell of bread wafting through the air.
Who knew that something as simple as whole wheat bread could spark such joy?
And honestly, who doesn’t love the warm, comforting embrace of freshly baked homemade bread? that nutty flavor, those fluffy textures—it’s enough to make your heart sing! so let’s dish about why this recipe has earned a cherished spot in my kitchen.
A Slice of History: Where It All Began
The origins of whole wheat bread stretch back to ancient times, with roots in civilizations that realized whole grains pack in a ton of flavor and nutrients.
It’s a staple that’s transitioned from rustic farmhouses to modern kitchens everywhere. lately, with so many folks leaning towards more healthy bread options , the popularity of whole wheat has soared! it's not just trendy; it’s packed with goodness.
If you’re new to baking, don’t sweat it. this recipe is labeled easy for a reason. you’ll need about 2 hours and 10 minutes of your day from start to finish.
That includes prep, the all-important rising time, and baking. get ready to turn your kitchen into a mini bakery! plus, it only costs a few bucks to make a whole loaf—talk about a win-win!
Why You’ll Love This Recipe
Now, let’s talk benefits! first off, whole wheat bread is loaded with dietary fiber, which is a game changer for your digestive health.
It helps keep you fuller longer—perfect for those busy days when you need a nutritious meal on the go. plus, when you make it at home, you control the ingredients.
No weird additives or preservatives here!
This bread is also seriously versatile. use it to whip up sandwiches, toast it for breakfast, or enjoy it with a big bowl of soup.
It's that simple bread recipe that fits right into any occasion—from a casual lunch to thanksgiving dinner. hosting a gathering? impress your guests with a rustic whole wheat loaf that’s both beautiful and delicious!
Perfect for Any Occasion
You might be wondering when to serve this beauty up. honestly, any time is the right time! it’s phenomenal for brunch with some avocado toast topped with a sprinkle of sea salt.
It’s a comfort food classic when served alongside a hot bowl of homemade chili, or just slathered with butter and honey as a snack.
Speaking of honey, that little addition is not just sweet; it enhances the bread's flavor and helps keep it moist!
Compared to other baking recipes, whole wheat bread has the edge with its nutritional benefits . think about it: fewer sugars, more vitamins, and enough goodness to fuel your day.
And hey, if you’re looking for vegan whole wheat bread , just skip the honey and use maple syrup. how cool is that?
So, ready to dive into the ingredients? Trust me—it’ll be worth every minute you spend in your kitchen!
Stay tuned for a breakdown of what you need to get this wonderfully hearty whole wheat loaf in the oven! Happy baking!
Essential Ingredients Guide for Baking Whole Wheat Bread
Baking can seem like a daunting task, but trust me, once you break it down, it’s like riding a bike—totally easy and oh-so rewarding! let’s get into the nitty-gritty of the essential ingredients guide for baking a wholesome loaf of baked whole wheat bread - healthy & easy .
I have to admit, there’s something magical about the aroma of freshly baked bread, right? just thinking about it makes me smile!
Premium Core Components
When you’re whipping up a batch of homemade bread , quality matters! Here are the premium core components you need:
-
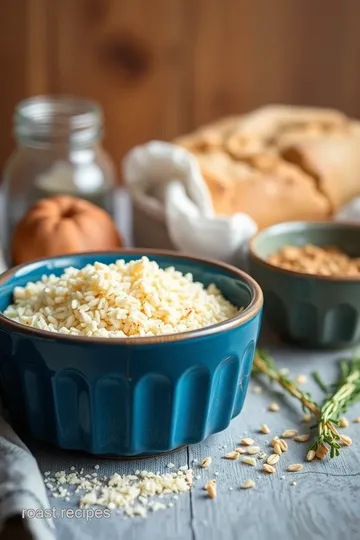
Whole Wheat Flour: You’re gonna need 3 cups (360g) of this star ingredient. Look for a coarse texture, which indicates it's fresh. Check the expiration date! Fresh flour has way more flavor.
-
Active Dry Yeast: Grab 1 ½ teaspoons (5g) . The good stuff will be granulated and soft. Store it in a cool, dark place for longer shelf life.
-
Salt: Just 1 teaspoon (5g) . Who knew something so tiny could make a massive flavor difference?
-
Sweetener: Choose between 2 tablespoons (30ml) of honey or maple syrup. Honey adds a lovely depth to your bread! Did you know honey can also help keep things fresh longer?
-
Olive Oil: A tablespoon ( 15ml ) helps the bread stay soft and adds a dash of richness.
-
Warm Water: You’ll need 1 ¼ cups (310ml) at about 110° F ( 43° C) . Too hot? You’ll kill the yeast. Too cold? It won’t activate. Find the sweet spot!
Signature Seasoning Blend
Let’s spice things up! for a little twist, consider adding optional ingredients. i’m talking about ½ cup of seeds or nuts (75g) .
Think about flaxseed or sunflower seeds for added crunch. those little guys not only enhance flavor but also bring in those whole grain bread benefits we love.
Smart Substitutions
Now, what if you don’t have all the ingredients? Life happens! Here are some smart substitutes that’ll keep you in the game:
-
Flour Alternatives: No whole wheat flour? No sweat! Use all-purpose or a gluten-free blend instead.
-
Sweetener Swap: Brown sugar or agave can step in if you’re out of honey.
-
Oil Options: If you’re running low on olive oil, try coconut oil or even applesauce for a healthier twist.
Kitchen Equipment Essentials
Before you start, gather your kitchen equipment essentials :
-
You’ll need a large mixing bowl and a loaf pan (9x5 inches works great).
-
A clean kitchen towel or plastic wrap is vital for rising dough.
-
And don’t forget a measuring cup ! You don’t want your bread to turn into a science experiment, right?
Being Smart with Storage
Lastly, storage is key for that bread freshness ! once your lovely loaf cools on a wire rack, wrap it in a clean kitchen towel.
If you want it to last, pop it into a zip-lock bag. i promise it’ll keep for several days, but you might just eat it all before that happens!
After gathering your ingredients and gear, you’ll be ready to dive into the world of baking bread at home . baking can take practice, but with this guide, you're equipped to tackle any easy baking recipe ! seriously, follow these tips and you’ll be on road to creating rustic whole wheat loaf that your whole family will rave about.
In the next section, we’re going to roll up our sleeves and get our hands dirty with the step-by-step process to bring this soothing recipe to life.
Stay tuned for some seriously scrumptious instructions coming your way!
Mastering the Art of Professional Cooking
Ah, the kitchen! it can feel like a magical place where flour dances in the air and the smell of fresh bread gets any heart racing.
If you want to step up your culinary game, exploring some professional cooking methods is where it’s at. i'm super excited to share how you can not just cook, but dazzle with your dishes!
Essential Preparation Steps
So, first things first—getting ready to cook is kind of like prepping for a big game. it’s all about mise en place , which is just a fancy french way of saying “everything in its place.
” seriously, having every ingredient prepped and measured can save you from a total cooking meltdown.
You’ve got to think about timing too. if you're like me, you might get distracted by a cute dog or catch a glimpse of a new recipe online.
My tip? set a timer for key steps— 1 hour for rising your bread dough, followed by 30 minutes for the second.
This helps you stay focused and organized.
And let’s not forget kitchen safety! Keep those surfaces clean, wash your hands often, and remember: hot pans can burn. A quick remphasis on that to avoid nasty accidents.
Step-by-Step Process
Now, let’s talk about how to actually put your best foot forward in the kitchen. Follow these clear, numbered steps to make your cooking flow smoothly:
-
Perfect that yeast: for 1 ¼ cups warm water (110° f or 43° c ), mix in 2 tablespoons of honey and 1 ½ teaspoons of active dry yeast.
Let it sit until it’s frothy—this is your yeast waking up!
-
Dry Ingredients Unite: Whisk 3 cups of whole wheat flour with 1 teaspoon of salt in a separate bowl.
-
Mix It Up: Gradually toss the flour mix into the yeast mixture and stir it up until a shaggy dough forms.
-
Knead Like a Pro: Don’t skip this! Flour your surface lightly and knead your dough for about 8- 10 minutes . You want it to feel smooth and elastic.
-
First Rise: Put that dough in a greased bowl, cover it, and let it sit in a warm spot for around 1 hour. It should double in size—just like magic!
-
Shape the love: punch it down (yes, really!) and shape it into a loaf, then pop it into a greased loaf pan for its second rise, which will be another 30 minutes .
-
Preheat the Oven: 10 minutes before you bake, crank your oven to 375° F ( 190° C) .
-
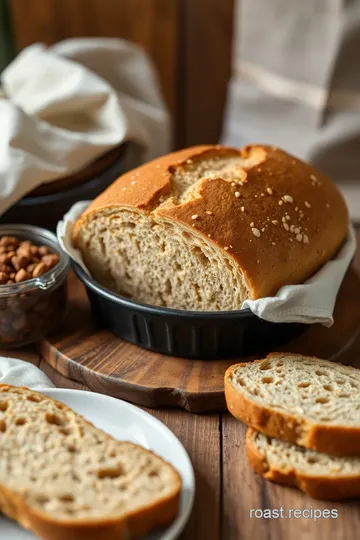
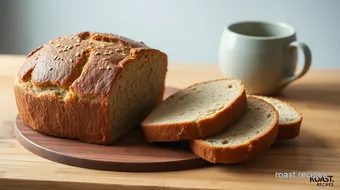
Bake It! Bake for 30 minutes. When you tap it, it should sound hollow. That’s how you know it’s done!
Expert Techniques
Incorporating some expert techniques can take your whole wheat bread from good to out-of-this-world amazing . checkpoint wise, you’ll want to make sure that the dough looks glossy and holds its shape before the first rise.
And if your bread doesn’t rise? Maybe it was too cold, or the yeast was expired. Don’t panic! Just remember for next time.
Success Strategies
Okay, the last part of our journey. If you wanna nail this whole wheat bread recipe , here are a few success tips:
- Avoid over-kneading. It’s a biggie!
- For extra yum, feel free to add seeds or oats; they add both texture and health benefits.
- For keeping things fresh, store your bread in a sealed bag. It’ll last longer.
Oh, trust me—i have let my beautiful bread go stale before. that’s a rookie mistake ! and if you want to get ahead, you can prep the dough the night before and let it rise in the fridge.
Nothing beats waking up to the smell of freshly baked bread.
So, there you have it! with these professional cooking methods, you’ll be well on your way to achieving that fluffy whole wheat bread everyone loves.
Now you’re ready to take that leap into baking bread at home —where the magic happens!
Additional Information
Stay tuned because next, we're diving deeper into the nutritional benefits of whole wheat and exploring even more fabulous homemade bread storage tips . Happy baking!

Bake Whole Wheat Bread - Healthy & Easy: Additional Recipe Information
So, you’re ready to bake whole wheat bread - healthy & easy ? awesome! but before you leap into the kitchen, let's sprinkle in some pro tips and secrets to make this journey a total breeze.
Believe me, a few little insights can elevate your homemade bread game!
Pro Tips & Secrets
Chef's insights: first off, yeast is your best friend. make sure your water is warm but not scalding hot; think baby’s bathwater, not a hot tub.
I’ve seen too many newbies boil their yeast alive, and that just won’t do!
Time-Saving Techniques: If you’re short on time, try a no-knead whole wheat bread method. You can just mix things, let them rise overnight, and bake them in the morning. Magic, right?
Flavor enhancement: want to jazz things up? add some seeds like sunflower or flaxseed into the dough for added fiber and crunch.
They give your bread that artisan vibe, without the hefty price tag.
Presentation advice: slice that bad boy up and instead of just throwing it on a plate, stack those slices upright or fan them out.
Don’t forget to sprinkle a little bit of flour or seeds on the cutting board. it’s like an instagram filter for your homemade bread!
Perfect Presentation
When it comes to plating techniques , think rustic. stack your loaf with some fresh herbs or a cute little jar of honey next to it.
A beautiful loaf deserves a gorgeous background.
Garnish Ideas: Fresh herbs like rosemary or thyme are fantastic garnishes. They smell great and give your bread a touch of class.
Color Combinations: Dark whole wheat with a bright green salad or colorful fruits makes your table pop! Contrast is key, folks.
Visual Appeal Tips: Consider cutting your bread into fun shapes if you're feeling adventurous! A simple cookie cutter can do wonders when serving for holidays or gatherings.
Storage & Make-Ahead
Now, let’s talk storage. You want that healthy bread to last, right? Keep it wrapped in an airtight container. This is going to keep it nice and fresh.
Preservation Methods: You can freeze bread slices in a zip-lock bag if you have extras. Just pop them in the toaster straight from the freezer! Easy peasy.
Reheating instructions: when you're ready to eat, if it’s been sitting a bit, a quick pop in the toaster or a quick wrap in a damp paper towel and 10 seconds in the microwave brings it back to life.
Freshness Duration: Homemade bread is best enjoyed within 3-5 days. But let’s be honest, once you taste it, it won’t last that long, right?
Creative Variations
Now, let’s get creative with some fun twists!
Flavor Adaptations: Feel free to swap in different herbs or spices. Cinnamon for a sweet breakfast vibe or garlic powder for a savory kick.
Dietary Modifications: Want it vegan? Just sub out honey for maple syrup or agave. Maybe you’re gluten-free? No worries! Use a gluten-free bread mix; there are some awesome ones out there.
Seasonal Twists: How about adding pumpkin spice for a fall vibe? Or maybe herbs like basil in the summer? The sky's the limit!
Regional Variations: Ever thought about turning this into a rustic whole wheat loaf ? Adding some ancient grains or adapting to your region’s flours can be a fun experiment.
Complete Nutrition Guide
Okay, let’s talk about why this is a whole wheat bread recipe you’ll want to keep.
- Nutritional Benefits of Whole Wheat : Whole wheat is packed with dietary fiber which is super important for digestion.
- Health Benefits : This bread has a lower sugar content and a higher protein content compared to store-bought options. Yay for healthy choices!
- Dietary Considerations : If you're watching your sodium, you can easily reduce the salt here.
Portion Guidance: Generally, one slice keeps it healthy, but you do you!
Expert FAQ Solutions
If you’ve got questions, i've got answers! one of the most common ones is, “why is my bread dense?” usually, it’s a yeast issue.
If it didn’t rise much, your yeast might be expired.
Success Tips: Make sure you're measuring your flour correctly – fluff it, spoon it, level it off. It makes a big difference.
And for those who want to change things up, try adding seeds to boost nutrition!
Conclusion
So there you have it! with a sprinkle of tips, a dash of creativity, and a spoonful of love, you can master the art of baking whole wheat bread.
Go ahead, give it a whirl! the smell of freshly-baked bread filling your kitchen? heavenly ! you’ll impress not just yourself but anyone lucky enough to snag a slice.
Happy baking, my friends!
Wholesome Whole Wheat Bread: Easy, Nourishing, and Delicious! Card
⚖️ Ingredients:
- 3 cups whole wheat flour (360g)
- 1 ½ teaspoons active dry yeast (5g)
- 1 teaspoon salt (5g)
- 2 tablespoons honey or maple syrup (30ml)
- 1 tablespoon olive oil (15ml)
- 1 ¼ cups warm water (310ml, about 110°F or 43°C)
- ½ cup seeds (sunflower, flaxseed, or pumpkin) (optional) (75g)
- ¼ cup oats (optional) (30g)
🥄 Instructions:
- Step 1: In a large mixing bowl, combine warm water, honey (or maple syrup), and yeast. Let it sit for 5-10 minutes until frothy.
- Step 2: In a separate bowl, whisk together whole wheat flour and salt.
- Step 3: Gradually add the dry ingredients to the yeast mixture, mixing until a shaggy dough forms.
- Step 4: Lightly flour a surface, place the dough, and knead for about 8-10 minutes until smooth and elastic.
- Step 5: Form the dough into a ball, place it in a greased bowl, cover with a towel, and let it rise in a warm area for 1 hour, or until doubled in size.
- Step 6: Punch down the dough, then shape it into a loaf. Place in a greased loaf pan.
- Step 7: Cover and let it rise again for 30 minutes until puffed.
- Step 8: Preheat your oven to 375°F (190°C) during the last 10 minutes of the second rise.
- Step 9: Bake for 30 minutes, or until the bread is golden brown and sounds hollow when tapped.
- Step 10: Remove from the oven, let cool in the pan for 10 minutes, then transfer to a wire rack to cool completely.
Previous Recipe: How to Make an Easy Salad with Avocado & Lemon Dressing: An Amazing Treat!
Next Recipe: How to Bake Sourdough Focaccia with Herbs: A Delicious Weekend Treat