Bake Fluffy Dinner Rolls - Easy & Irresistible
Looking for the perfect fluffy dinner rolls? I promise, these homemade rolls—light, buttery, and oh-so-easy—will elevate any meal. Bake Fluffy Dinner Rolls - Easy & Irresistible today!

- Welcome to the Wonderful World of Dinner Rolls
- Let’s look into into Dinner Rolls
- Rollin’ in the Benefits
- Transitioning to Your Ingredients
- Your Go-To Essential Ingredients Guide
- Perfecting Your Bake: The Professional Cooking Method
- Pro Tips & Secrets for Bake Fluffy Dinner Rolls - Easy & Irresistible
- Perfect Presentation of Your Rolls
- Storage & Make-Ahead Tips
- Creative Variations
- Complete Nutrition Guide
- Expert FAQ Solutions
- Getting Started!
- Recipe Card
Welcome to the Wonderful World of Dinner Rolls
Let me take you back to my childhood kitchen. picture it: my grandmother, the queen of comfort food , was whipping up a batch of fluffy dinner rolls .
Oh my gosh, that buttery scent filled the whole house! it was the kind of smell that made everyone drop whatever they were doing and flock to the kitchen.
And now, as i’ve grown into a mom who attempts to recreate those moments, i realize how special it is to bake fluffy dinner rolls - easy & irresistible .
When you get that first warm roll slathered in butter, it's a little taste of heaven, am i right?
Let’s look into into Dinner Rolls
Dinner rolls have been around forever, it feels like. they trace back to ancient meals when bread was a staple.
Those simple, rustic rolls were a way to soak up sauces or make a sandwich. fast forward to today, and they're as popular as ever.
Whether it’s a sunday family dinner or a thanksgiving feast, these homemade dinner rolls are always a hit!
Now, don't let the thought of baking scare you. this recipe is super easy ! you can whip up these rolls in about 1 hour and 35 minutes , with just 15 minutes of active prep and a few rises.
Your final yield? a glorious 12 buttery dinner rolls that will vanish faster than you can say “pass the bread.
”
Rollin’ in the Benefits
So, what makes these rolls stand out? first, let’s talk nutrition. these soft bread rolls are made with minimal, wholesome ingredients.
Plus, they’re way better for you than those store-bought options. you have control over the quality of your ingredients, and you can even switch things up for dietary needs, like making gluten-free dinner rolls .
But these rolls aren't just about health—they're all about comfort. think about it: they elevate any meal! you can use them for dipping, sopping up sauce, or just enjoying them warm on their own.
Honestly, nothing beats a fresh roll, right? they're also perfect for special occasions. birthdays, holidays, or just family dinners, these rolls can be the star of the show—or at least a fantastic supporting actor!
When it comes to ease, it doesn’t get much better than easy dinner rolls . i mean, who doesn’t love a recipe that’s straightforward yet yields bakery-style rolls ? and trust me, with the right baking tips for beginners , you’ll be a pro in no time.
Just imagine the compliments you'll get!
Transitioning to Your Ingredients
As you dive into the world of baking with me, you might be wondering what goes into these delicious roll recipes .
Spoiler alert: it’s not much. you probably have most of the ingredients already in your pantry! from flour and yeast to eggs and butter, you’ll be well on your way to making dinner rolls from scratch that your family won’t forget.
So, get ready to gather your supplies because we’re about to embark on a delightful baking adventure that leads to those light and fluffy bread rolls you’ve been dreaming about! let’s make it happen!
Your Go-To Essential Ingredients Guide
Cooking is like building with lego blocks; you need the right pieces to create something amazing. when you're gearing up for your kitchen adventures, knowing your essential ingredients is key.
Let’s explore what you need, how to use it wisely, and a sprinkle of my favorite cooking tips to make sure you get it just right .
Premium Core Components
First up, let's get into the premium core components for any cook. We're talkin' about the rockstars of the pantry here.
-
Measurements:
- For the perfect fluffy dinner rolls, you’ll use 4 cups (480g) of all-purpose flour. Measurements are crucial, so don’t eyeball it—grab those measuring cups!
- Speaking of, for our metric friends, that’s roughly 480g of flour.
-
Quality Indicators:
- Fresh yeast is vital for baking with yeast recipes. Make sure your packet isn’t expired; it should be crumbly, not gooey!
- Look for vibrant color in herbs; they should be bright and fragrant. Trust me, you’ll taste the difference in those buttery dinner rolls !
-
Storage Guidelines:
- Store your flour in a cool, dry place. It’ll last about six months in the pantry, but if you pop it in the freezer, it can go for up to a year .
-
Freshness Tips:
- For ingredients like butter and eggs, always check the expiration dates . And hey, when in doubt, sniff it out!
Signature Seasoning Blend
Nothing enhances flavor quite like a well-thought-out signature seasoning blend .
-
Essential Spice Combos:
- You can't go wrong with salt and pepper as your base. Add paprika, garlic powder, and onion powder for a classic flavor bomb.
-
Herb Selections:
- Fresh basil or parsley can brighten up any dish but experiment with dinner roll variations ; try adding herbs to your dough for something fun!
-
Flavor Enhancers:
- A dash of vanilla in your rolls? Yes, please! It’ll give them that bakery-style aroma.
-
Regional Variations:
- If you want to take a detour, inspired by Southern cooking, throw a little more sugar and buttermilk into your rolls for a sweeter, richer flavor.
Smart Substitutions
Oh, life happens, and sometimes you don’t have every ingredient on hand. No worries! Here are some smart substitutions .
-
Common Alternatives:
- If you’re out of all-purpose flour, you can use whole wheat flour instead—just add a bit more water to your dough.
-
Dietary Modifications:
- Have allergies? No problem! Check out gluten-free dinner rolls ; they’ll still be soft and fluffy but made without gluten.
-
Emergency Replacements:
- If you find yourself without milk, you can substitute with water or broth for savory dishes. Your rolls will turn out fine, I promise!
-
Seasonal Options:
- Berry season? Toss in some fresh fruit into the dough; it’ll be a delightful twist!
Kitchen Equipment Essentials
Alright, let’s look at the must-have tools for your baking kingdom.
- You gotta have a mixing bowl and measuring cups.
- A sturdy baking sheet and parchment paper are also a must—trust me, nobody enjoys scrubbing burnt-on dough.
- And don’t forget a pastry brush for that glorious melted butter brushing on top of your rolls right before they hit the oven.
Closing Thoughts
To sum it all up, gathering these essential baking ingredients and tools ensures your journey in baking is smooth. want to put this knowledge to the test? let’s jump into our recipe for bake fluffy dinner rolls - easy & irresistible .
With these tips, you'll be whipping up some delicious roll recipes that will have your family lining up for seconds in no time.
Whether you’re crafting traditional dinner rolls or diving into fun variations, you’ll be well-equipped to create some bakery-style rolls right at home!
So, are you ready to roll? (See what I did there?) Let’s dive into the instructions section !
Perfecting Your Bake: The Professional Cooking Method
So, you've decided it's time to elevate your bread game. oh my gosh, there’s nothing quite like fresh, homemade dinner rolls wafting through your kitchen! let’s break down the professional cooking method to help you bake those fluffy dinner rolls like a pro.
This guide is packed with tips—for real, you’ll want to have this saved for your next baking adventure!
Essential Preparation Steps
Before diving into mixing, let’s get our ducks in a row. Anyone who's baked will tell you about the magic of mise en place —which literally means “everything in its place.”
Start by measuring all your ingredients: flour, sugar, yeast, and those sweet, sweet eggs. Seriously, who doesn't love cracking an egg? Just watch out for shell bits!
Next, keep time in check. you’ll need about 1 hour for rising, and 20 minutes for baking. that’s 1 hour 35 minutes total to deliciousness, but don’t rush it; good things take time.
One last thing— safety first ! always wash your hands before cooking and keep your workspace clean to avoid any cross-contamination.
Plus, watch those oven mitts if you're baking at 375° f ( 190° c) ; we wouldn't want any singed fingers.
Step-by-Step Process
Alright, let’s get into the nitty-gritty! Here’s how to bake fluffy dinner rolls step by step:
-
Activate yeast: combine 1 cup warm milk (about 110° f/ 43° c ) with 2 tablespoons of sugar . add 2 ¼ teaspoons of yeast and let it bloom for 5 minutes until foamy.
-
Prepare dough: in a bowl, mix 4 cups of flour and 1 teaspoon of salt . create a well, pour in the yeasty goodness, melted butter, and 2 eggs .
Stir it all until a dough forms.
-
Knead Dough: Flour a surface and knead for 8- 10 minutes until it feels smooth and elastic. It’s like giving your dough a little workout!
-
First Rise: Toss your dough into a greased bowl, cover it up, and let it rise in a warm place for about 1 hour until it’s popped up like a balloon.
-
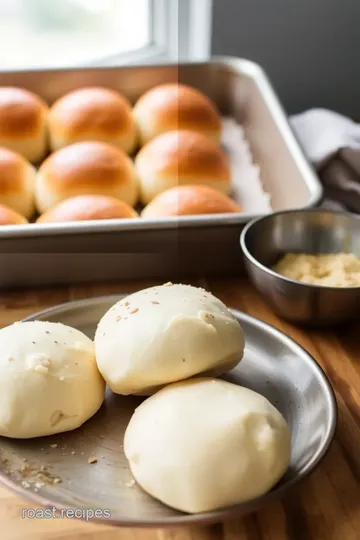
Shape Rolls: Punch down that dough (no hard feelings, right?), then divide it into 12 pieces . Shape each into little balls.
-
Second Rise: Place the rolls on a baking sheet, give them some space. Cover and let them rise again for about 30 minutes .
-
Preheat Oven: While waiting, turn the oven on to 375° F ( 190° C) .
-
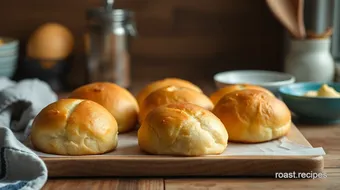
Bake: pop those bad boys in the oven for 20- 25 minutes . look for a golden brown color, and don't be afraid to show them some love by tapping the bottom— it should sound hollow.
-
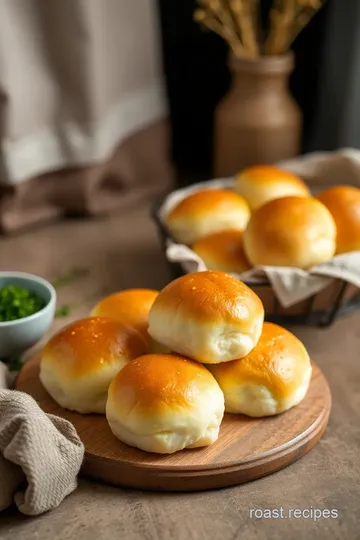
Brush with Butter: Take them out, and while they’re still warm, brush on that melted butter. I mean, come on—who doesn’t love buttery dinner rolls?
-
Cool and Serve: Let them cool for just a few minutes before diving in.
Expert Techniques
Want to step up your game? Pay attention to these expert techniques :
- Don’t skip the kneading! It develops gluten, which helps those rolls get that soft, airy texture we crave.
- Check internal temp: If you're uncertain about doneness, a food thermometer should read 190° F ( 88° C) inside the rolls.
- Quality checkpoints: Look for a beautiful golden brown top and a light texture.
If things don’t turn out just right, don’t sweat it! If they don’t rise, your yeast might’ve gone to yeast heaven.
Success Strategies
Want to ensure you nail these fluffy rolls? Here’s how:
- Common mistakes: Don’t rush the rise times. If they say 1 hour , give it that hour!
- Quality assurance: Check that your yeast is fresh before you begin. Older yeast can be a total downer.
- Make-ahead options: These rolls freeze really well! Just cool them down, wrap them tightly, and stash them away for a future comfort food night.
Baking with yeast can be a bit intimidating if you're new, but trust me , with these tips, you're well on your way to mastering those easy dinner rolls .
In Summary
So, there you have it. bake fluffy dinner rolls - easy & irresistible is totally achievable with this professional method.
Just remember, baking is as much about the journey as it is about the destination. now, get ready to wow your friends and family with warm, buttery, soft bread rolls !
Oh, and before you dive into your next recipe, check out the Additional Information section for some fun suggestions on variations and serving ideas to keep your meals exciting! Happy baking!
Pro Tips & Secrets for Bake Fluffy Dinner Rolls - Easy & Irresistible
Alright, if you're diving into these fluffy dinner rolls , let me share some pro tips that are game-changers. first off, when you’re baking, time matters.
Don’t rush the rise time for rolls ; it gives your dinner rolls that amazing light and airy texture. i usually set a timer and go watch a quick episode of my favorite show (hello, binge-watch).
Another secret? always activate your yeast properly. give it that warm milk hug – around 110° f is perfect. it will feel all warm and gooey, and then boom! you have foamy yeast ready to make your rolls rise to greatness.
Seriously, that foamy top is like the yeast saying, "i’m ready!"
Also, kicking up the flavor can be as simple as tossing in some garlic powder, herbs, or even cheese into the dough.
Oh, and when it comes to that buttery topping , brush those warm rolls just before serving. it totally elevates the experience.
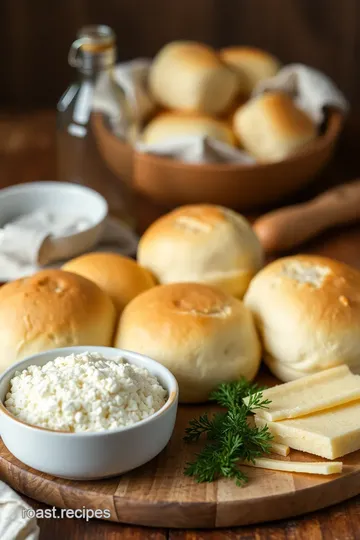
Perfect Presentation of Your Rolls
Now, let’s talk about how to plate these beauties. You don’t just want to shove those rolls on the table straight from the oven. Nope, they deserve the spotlight!
Plating techniques can really elevate your dinner game. opt for a nice wooden board and layer your rolls in a circle, like a roll crown .
It’s super impressive and looks fancy without the fuss. if you’re feeling extra, sprinkle some fresh herbs or sea salt on top for that pop of color and flavor.
Speaking of visuals, pay attention to your color combinations – warm golden-brown rolls against a contrasting green garnish makes a mouthwatering scene.
You can even serve them with a small dish of melted butter on the side, how cute is that?
Storage & Make-Ahead Tips
Now, what if you're thinking ahead? i got you covered. these homemade bread baking wonders can be made a day or two in advance! just shape those rolls, place them on the baking sheet, and pop them in the fridge instead of letting them rise again.
Let them sit out for about 30 minutes before baking.
For storage, be sure to toss any leftovers in an airtight container to keep them fresh for up to 3 days.
If you want to save them longer, feel free to freeze. trust me; freshly baked bread at home is worth waiting for later! just reheat them in the oven for a couple of minutes to bring back that soft texture.
Creative Variations
Feeling adventurous? there are dinner roll variations that can put a fun twist on your traditional rolls. how about adding jalapeños or shredded cheese for a kick? or take inspiration from the seasons.
In fall, try pumpkin spice rolls – the warm spices are just heavenly.
Don’t forget about dietary modifications ! for gluten-free dinner rolls , just swap in your favorite gluten-free blend and you’re golden.
And if you want to switch it up, get crazy with different toppings. flaky sea salt, herbs, or even a sprinkle of cinnamon sugar can be delightful.
Complete Nutrition Guide
Before you go munching down, let’s chat about what’s in those rolls. each roll packs around 150 calories , with a good mix of carbs and just enough fat to keep it tasty.
With the right portion guidance, they're a nice addition to any meal without sending you overboard.
These rolls are more than just comfort food recipes ; they're also a fun baking experience. you can make them healthier too—using whole wheat flour enhances the fiber and nutrients.
And let’s be real, who doesn’t want to say they made the best dinner rolls from scratch?
Expert FAQ Solutions
Got burning questions? no problem! one common question is, "why did my rolls not rise?" be sure you’re using fresh yeast.
If it’s old, you might as well be baking bricks! another tip – if they come out too dense, check your kneading time.
The dough should be smooth and elastic .
And if someone asks how to store those luscious rolls, just reassure them: serving warm rolls is key! Just bring them back to life quickly in the oven if needed.
Getting Started!
Baking these soft bread rolls is as easy as it gets, and everyone can get involved—trust me, cooking with kids is a blast with this recipe! put on some fun music, and let’s get baking.
You’ll have warm dinner bread in no time, just beckoning for a big scoop of butter.
So, ready to bake your own fluffy, buttery dinner rolls? give it a shot. they're not just a side dish, they're a family staple everyone will keep coming back to.
Happy baking, friends!
Bake Fluffy Dinner Rolls - Easy & Irresistible Card
⚖️ Ingredients:
- 4 cups (480g) all-purpose flour
- 2 tablespoons (25g) granulated sugar
- 2 ¼ teaspoons (1 packet) active dry yeast
- 1 teaspoon (5g) salt
- 1 cup (240ml) warm milk (about 110°F/43°C)
- ¼ cup (60g) unsalted butter, melted
- 2 large eggs (room temperature)
- 2 tablespoons (30g) unsalted butter, melted (for brushing)
🥄 Instructions:
- Step 1: In a small bowl, combine warm milk (110°F/43°C) and sugar. Sprinkle yeast over the milk and let it sit for about 5 minutes until foamy.
- Step 2: In a large mixing bowl, whisk together flour and salt. Make a well in the center and add the yeast mixture, melted butter, and eggs. Stir until a dough forms.
- Step 3: Transfer dough to a floured surface and knead for about 8-10 minutes until smooth and elastic.
- Step 4: Place the dough in a greased bowl and cover with a kitchen towel or plastic wrap. Let it rise in a warm place for about 1 hour, until doubled in size.
- Step 5: Punch down the dough and turn it onto a floured surface. Divide dough into 12 equal pieces and shape each into a ball.
- Step 6: Place shaped rolls on a lined or greased baking sheet, spacing them slightly apart. Cover and let rise for another 30 minutes.
- Step 7: Preheat the oven to 375°F (190°C).
- Step 8: Bake rolls for 20-25 minutes, or until golden brown on top.
- Step 9: Remove from oven and brush the tops with melted butter.
- Step 10: Allow rolls to cool slightly before serving warm.
Previous Recipe: How to Bake Sourdough Baguettes: Delicious Crispy Crusty Loaves!
Next Recipe: Ultimate Bake Ziti: My Grandmother's Italian Comfort Food Delight