Beer Can Chicken with Crispy Skin: Grilled Perfection
Craving the best Grill Beer Can Chicken with Crispy Flavor? Try my simple herb-glazed version! So juicy and flavorful, it's perfect for weeknights or holidays. Get my tips inside!

- look into Into Deliciousness: What’s Better Than Grill Beer Can Chicken with Crispy Flavor?
- Essential Ingredients Guide for the Perfect Grill Beer Can Chicken with Crispy Flavor
- The Sizzle of Professional Cooking: Getting it Right
- Pro Tips & Secrets to Perfect Your Grill Beer Can Chicken with Crispy Flavor
- Perfect Presentation Techniques
- Storage & Make-Ahead
- Creative Variations
- Complete Nutrition Guide
- Wrapping It Up
- Frequently Asked Questions
- Recipe Card
look into Into Deliciousness: What’s Better Than Grill Beer Can Chicken with Crispy Flavor?
Have you ever flipped through those pages of magazines during summer? you know, the ones that show dreamy backyard barbecues where everyone is laughing, interacting, and enjoying some perfectly grilled chicken? well, let me share a little secret with you— grill beer can chicken with crispy flavor is the ultimate showstopper for those gatherings! imagine this: it’s a hot summer day, and the smell of that juicy, flavorful chicken hits everyone before it even hits the table.
Trust me, that’s a memory you’ll want to create.
A Storied Recipe with Modern Popularity
The origins of beer can chicken are kinda fun! this all started in the ‘90s as this simple yet brilliant outdoor cooking method.
Grilling ensoiasts discovered that placing a beer can inside a chicken adds moisture and flavor. and now? it’s practically a rite of passage among grill masters and backyard warriors alike!
Let’s not kid ourselves. the modern bbq scene is all about juicy, crispy grilled chicken that makes your mouth water.
Because you know what? it’s not just chicken; it’s a whole experience . the best part? this recipe isn’t rocket science.
It’s totally doable for home cooks at a medium difficulty level. with just 1 hour 15 minutes of grilling, you can serve up a glorious bird that serves 4-6 people .
And, honestly, if we’re talking money, this one’s a winner. most ingredients will run you about $15-20 , depending on what you pick up.
Not too shabby for dinner that feels like you’re dining out!
Why You’ll Love This Recipe
Let’s get real for a second. what’s the best part about that juicy grilled chicken ? the health benefits! chicken is packed with protein and lower in fat than many meats if you trim the skin.
Plus, when you add fresh herbs and spices, you’re not just making a meal; you’re setting the stage for a culinary masterpiece!
And if you’re looking for options, this beer-infused beauty is super versatile. use it for summer parties, family cookouts, or even date nights in.
The homemade marinade can do wonders too—think herb-seasoned goodness with the added zing from beer! this is where you can really shine during gatherings.
Your friends will rave about how you nailed your chicken grilling methods .
For those heated summer nights, this dish stands out against your run-of-the-mill grilled recipes. It’s not just another chicken dish put on the grill; it’s culinary magic in the backyard.
The Perfect Setup for Your Grilling Adventure
So, what from this tasty journey went off without a hitch? Well, grilling chicken time is crucial. Getting that chicken to the perfectly cooked temperature of 165° F ( 74° C) can seem tricky, but here’s the golden rule: Patience is key!
And if you want to up your bbq game, think about using seasoning for grilled chicken that layers flavor. fresh herbs? yes, please! want the skin crispy like a crunchy outside while juicy inside? we got you covered on those crispy skin techniques you never knew existed.
After you’ve experienced this delightful dish, pairing it with some flavored beer chicken or delicious sides amplifies the grilled experience. Think creamy coleslaw or grilled veggies bursting with flavor.
So, are you feeling ready to tackle this? If you are, let’s go through what you need and how to make this masterpiece that everyone will devour.
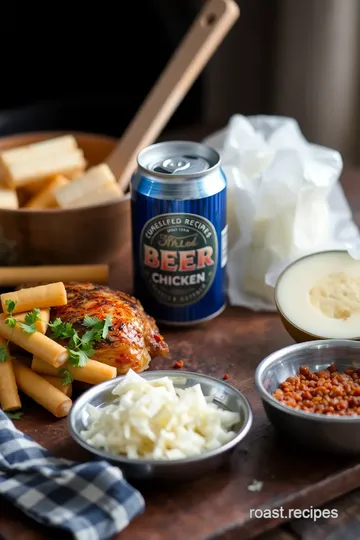
Ingredients for Your Beer Can Chicken Sensation
You’ll need:
- 1 whole chicken (preferably organic)
- 1 can of your favorite beer
- A splash of olive oil, salt, pepper, and a handful of spices like garlic powder and smoked paprika.
Stay tuned as we break down each fun, flavorful step to enjoy this easy BBQ chicken adventure that’ll leave you in barbecue bliss!
Essential Ingredients Guide for the Perfect Grill Beer Can Chicken with Crispy Flavor
Alright, y'all, let's dive into the ultimate guide for getting your beer can chicken recipe down pat. if you're looking to make that crispy grilled chicken everyone raves about, this is where you start.
Here’s everything you need about getting those premium ingredients, signature seasonings, and the essential kitchen gear.
Premium Core Components
Detailed measurements: if you're like me, precision matters! you'll want to get these right, whether you’re using us measurements or metric .
For that whole chicken, you'll need about 3-4 lbs (1.4-1.8 kg) . and don’t skimp on that beer — go for a solid 12 oz (355 ml) can.
Quality Indicators: When you're picking your chicken, look for organic if you can. It’s a game-changer. That meat will be juicier and way more forgiving to cook!
Storage Guidelines: Keep your chicken chilled until you're ready to cook, and that beer? It’ll hang tight in the pantry as long as it’s cool and out of sunlight.
Freshness tips: choose chickens that feel firm and have a pleasant, fresh smell. avoid any that look slimy or have a funky odor.
Trust me; you don't want to spoil your backyard grilling ideas!
Signature Seasoning Blend
Essential spice combinations: for that full-flavored crispy skin , you need a killer seasoning combo. use 1 tablespoon each of salt, black pepper, garlic powder, onion powder , and smoked paprika .
Add some cayenne if you wanna spice things up!
Herb selections and pairings: think rosemary or thyme, folks. they complement that chicken like you wouldn’t believe, especially when you stuff them inside the cavity.
It’s like a flavor explosion waiting to happen!
Flavor Enhancers: Along with salt and pepper, take advantage of aromatics . A splash of Worcestershire sauce and a bit of lemon juice in your marinade can do wonders.
Smart Substitutions
Common Alternatives: No beer around? No problem! Go for apple juice or a flavored soda if you want to skip the alcohol.
Dietary Modifications: Need gluten-free options? Double-check your seasoning mixes and sauces. Many brands offer gluten-free versions of your go-to condiments!
Emergency Replacements: Out of smoked paprika? Regular paprika or even chili powder can step up and save the day.
Seasonal Options: In the summer, toss in fresh herbs straight from your garden. That can turn your marinated chicken on the grill into a true masterpiece.
Kitchen Equipment Essentials
Must-have tools: you gotta have a good grill—either charcoal or gas will do. a meat thermometer is crucial; there’s no guessing with chicken, especially if you're worried about achieving the perfectly cooked chicken temperature of 165° f ( 74° c) .
Alternative equipment options: don’t have that beer can holder? no worries; anything that keeps your chicken upright works! i’ve used a simple beer can without a fancy holder, and it turned out great.
Preparation Tips: Marinate your chicken for a couple of hours (or longer if you can!) for max flavor. Seriously, don’t rush this part. Your taste buds will thank you later!
Storage Solutions: Wrap any leftover chicken tightly and get it in the fridge. It’s amazing the next day on a sandwich or salad.
By keeping these essentials in mind, you’ll be well on your way to making juicy grilled chicken that the whole neighborhood will envy.
Now, ready for some grilling chicken tips ? let’s move on to those step-by-step instructions and get that grill fired up for your next summer cookout.
Happy grilling!

The Sizzle of Professional Cooking: Getting it Right
Cooking like a pro starts long before you even fire up the grill. honestly, these essential preparation steps can make or break your culinary adventure.
When it comes to grilling a show-stopper like grill beer can chicken with crispy flavor , let’s talk about how to get that juicy, beer-infused goodness right from the get-go!
Essential Preparation Steps
Mise en place is your best friend. sounds fancy, but it just means “everything in its place.” gather all your ingredients.
For our beer can chicken, that includes your chicken, your favorite beer, and all those delicious spices – garlic powder , smoked paprika , you name it! having everything ready saves you from frantic searches mid-cook.
Time management is crucial. give yourself around 15 minutes for active prep , but you’ll want to marinate for 30 minutes to 2 hours .
This waiting game is where the magic happens, letting those flavors soak in. remember, good things come to those who wait!
Now, organization? oh buddy, my kitchen used to look like a tornado hit it. but keeping your workspace tidy, with tools and ingredients lined up, makes a world of difference.
It’s easier, less stressful, and you’ll actually have fun cooking!
Safety first! keep that grill clean and be aware of where hot surfaces are! have a meat thermometer handy so that your chicken hits at least 165° f ( 74° c) to be sure you’re serving it safe and sound.
Step-by-Step Process
Ready for the fun part? Here’s how to absolutely nail your Beer Can Chicken :
-
Prepare the Marinade : Whisk together olive oil, salt , pepper , garlic, onion powder, and paprika. This is where you create a flavor bomb to keep that chicken succulent.
-
Marinate the Chicken : Rub the marinade all over the chicken, even under the skin. Make sure it chills in the fridge for at least 30 minutes .
-
Grill Prep : Preheat your grill to medium-high heat (about 375° F / 190° C) . If you’re using charcoal, remember to set it for indirect cooking for that perfect roast.
-
Beer Can Setup : Open your can of beer (heck, take a sip) and poke some holes in the top. That steam makes the chicken juicy.
-
Insert the Chicken : Pop that beer can in the cavity of your chicken. Trust me, it’s going to stand like a champ.
-
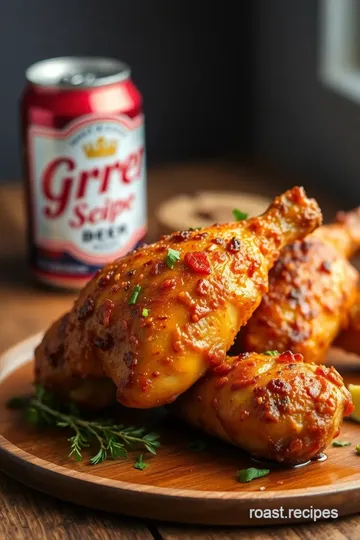
Grill It : Place your chicken on the grill away from direct heat and cover. Grill for about 1 hour to 1 hour and 15 minutes .
-
Doneness Check : Remember the thermometer? Stick it in that thickest part of the thigh. You’re looking for 165° F ( 74° C) .
-
Crisp It Up : Want crunchy skin? Move it to direct heat for the last 5- 10 minutes . Let that skin go to town!
-
Rest and Serve : After cooking, let the chicken rest for 10 minutes before slicing. This makes for juicy goodness!
Expert Techniques
Now, let’s dive into some expert tips that I’ve learned over many grilling seasons.
One thing I always forget? Timing! Keep a close watch on that grill. If you stray away too long, you might end up with overcooked chicken. Nobody wants that!
Quality checkpoints are crucial. Check the chicken at about the 45-minute mark. If it doesn’t look golden, it’s not done! And don’t forget to rotate it if you're using a charcoal grill.
Troubleshooting? If your chicken isn’t browning, consider the grill’s heat distribution. Move it around a bit or adjust those vents!
Success Strategies
Want to avoid common mistakes? Don’t rush that marinade. Allow it to do its thing! Also, drying off the chicken before marinating is key for that crispy skin you crave.
Quality assurance is about checks. Internal temperature is your best bud here. Follow those guidelines, and you’ll have the most juicy grilled chicken on your block.
Make-ahead options are also great for gatherings. You can marinate the chicken a day in advance. Let those flavored beer chicken vibes soak in!
Now that you’re set up to grill a chicken that’ll be the talk of summer cookouts, we’re diving into some additional information that’s sure to further elevate your grilling game! From seasoning ideas to how to choose a perfect side dish, I’ve got your back! Happy grilling, friends!
Pro Tips & Secrets to Perfect Your Grill Beer Can Chicken with Crispy Flavor
Oh my gosh, let me tell you, the first time i tried making grill beer can chicken with crispy flavor , i was blown away! it's honestly one of the simplest yet most satisfying recipes out there.
Now, before we dive into the bourbon barrels of this delectable recipe, let me share some pro tips and secrets that’ll elevate your chicken game to pro-level.
Chef's Personal Insights
First, always opt for a whole chicken around 3-4 lbs. it’s the sweet spot for that juicy, marinated chicken on the grill .
And trust me, rub that seasoning under the skin ! it makes a world of difference. i learned that the hard way when i first skipped this step, and the chicken was good but lacked that burst of flavor i was aiming for.
Time-Saving Techniques
A quick tip: if you can, prepare your marinade the night before. let your chicken soak in those flavors overnight.
You’ll cut your active cooking time and boost the flavor exponentially—talk about a match made in chicken heaven!
Flavor Enhancement
Don’t skimp on the spices! a flavorful beer-infused chicken is all about seasoning. and for a kick that’ll make your taste buds dance, try adding some cayenne pepper.
You want that crispy skin? make sure you crisp it up by moving the chicken over direct heat just at the end—thank me later!
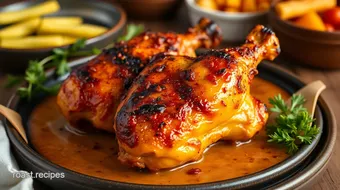
Presentation Advice
Now let's talk presentation—because, let's be real, nobody wants to eat a sad-looking chicken. once your juicy grilled chicken is done, give it a little rest time (at least 10 minutes).
This allows the juices to redistribute. legend has it that’s how the big bbq gurus achieve that mouthwatering result. for extra flair, serve it with some colorful roasted veggies on the side.
Your guests will think they’re at a fancy restaurant!
Perfect Presentation Techniques
Another aspect I love about grilling is putting on a show. You want your Chicken recipes for BBQ to shine! Here are a few cool plating techniques:
Garnish Ideas
A sprinkle of fresh herbs like parsley or cilantro adds a pop of color. it’s super simple, but trust me, it elevates the dish from backyard grilling to culinary art.
You can even wedge a lemon or lime on the side for a nice zing.
Color Combinations
Pair your dish with vibrant sides like grilled corn or a mixed green salad. This not only makes dinner look appealing but also keeps things healthy!
Storage & Make-Ahead
So, what if you have leftovers? Here’s the lowdown.
Storage Guidelines
Wrap that crispy grilled chicken tightly in aluminum foil or place it in an airtight container. It’ll stay fresh in the fridge for about 3–4 days —if it even lasts that long!
Reheating Instructions
To reheat, pop the chicken in a 350° f oven for about 20 minutes. keep the skin crispy by covering it in foil for the first 10 minutes, then take it off to crisp back up.
Creative Variations
What’s great about this recipe is its versatility. You can jazz it up to keep things fresssh!
Flavor Adaptations
Want to change up the flavor? how about a spicy beer can chicken ? just swap out the regular beer for a spicy one! or try adding a tangy bbq sauce during the last few minutes of grilling.
Dietary Modifications
If you’re looking for alternatives to beer can chicken , feel free to use non-alcoholic beer or even soda! I once used apple cider, and it gave a very unique twist.
Seasonal Twists
During summer, toss in some fresh herbs or watermelon to the grill for sides. It brings a fresh, juicy flair to your cookout.
Complete Nutrition Guide
Let’s not forget to chat about nutrition.
Detailed Breakdown
A serving of this delightful dish has approximately 350 calories , which is pretty reasonable for a hearty dinner! Pair it with some healthy sides, and you’ve got yourself a balanced meal.
Health Benefits
Chicken is packed with protein—about 30g per serving! It’s great for energy and muscle recovery.
Dietary Considerations
If you’re watching your sodium, be mindful of the seasoning. You can always adjust as needed.
Wrapping It Up
So there you have it! with these tips and insights, you’re set to create an incredible grill beer can chicken with crispy flavor that will impress everyone at your summer cookout.
Whether you’re a seasoned grilling pro or a newbie, this recipe is approachable and downright delicious. get outside, fire up that grill, and get ready to have some fun! happy grilling!
Frequently Asked Questions
How do I make sure my Grill Beer Can Chicken with Crispy Flavor turns out juicy?
To ensure your chicken stays juicy, it’s crucial to marinate the chicken for at least 30 minutes but no longer than 2 hours. Also, using a meat thermometer to check the internal temperature is key; aim for 165°F in the thickest part of the thigh for safe and moist meat.
What can I substitute for beer in the Grill Beer Can Chicken with Crispy Flavor recipe?
If you're looking for alternatives to beer, apple juice or non-alcoholic beer works well for steaming the chicken. Additionally, you can use flavored broth to infuse the chicken with savory flavor while still achieving that moist texture.
How can I make the skin extra crispy on my Grill Beer Can Chicken?
To achieve extra crispy skin, move the chicken over direct heat for the last 5-10 minutes of cooking. Additionally, ensuring that the chicken is well-dried before applying the marinade and keeping a steady grilling temperature will also help enhance the crispiness.
Can I prepare the Grill Beer Can Chicken in advance?
Yes, you can prepare the marinade and apply it to the chicken a day in advance. Just keep the marinated chicken covered in the refrigerator before grilling. However, it's best to cook the chicken the same day for optimal freshness and flavor.
What are some good side dishes to serve with Grill Beer Can Chicken?
Grilled vegetables, creamy coleslaw, or corn on the cob make excellent side dishes for this dish. You can also pair it with a fresh garden salad or baked potatoes for a well-rounded meal.
How should I store leftovers from the Grill Beer Can Chicken?
Store any leftover chicken in an airtight container in the refrigerator for up to 3 days. For longer storage, you can freeze the chicken for up to 3 months. Just ensure it's cooled completely before sealing it to preserve its flavors and texture.
Beer Can Chicken with Crispy Skin: Grilled Perfection Card
⚖️ Ingredients:
- 1 whole chicken (3-4 lbs / 1.4-1.8 kg), preferably organic
- 1 can (12 oz / 355 ml) of your favorite beer (lager or ale)
- 2 tablespoons (30 ml) olive oil
- 1 tablespoon (15 g) salt
- 1 tablespoon (10 g) black pepper
- 1 tablespoon (8 g) garlic powder
- 1 tablespoon (8 g) onion powder
- 1 tablespoon (8 g) smoked paprika
- 1 teaspoon (5 g) cayenne pepper (optional for heat)
- 1 tablespoon (15 ml) lemon juice (optional)
- 1 tablespoon (15 ml) Worcestershire sauce (optional)
- Fresh herbs (e.g., rosemary, thyme) for stuffing (optional)
🥄 Instructions:
- Step 1: Whisk together olive oil, salt, black pepper, garlic powder, onion powder, smoked paprika, and cayenne pepper. If using, add lemon juice and Worcestershire sauce.
- Step 2: Pat the chicken dry and rub the marinade all over, including under the skin. Let it marinate for 30 minutes to 2 hours in the refrigerator.
- Step 3: Preheat the grill to medium-high heat (around 375°F / 190°C). If using charcoal, arrange the coals for indirect cooking.
- Step 4: Open the beer can and take a few sips (or pour it into a bowl for cooking). Use a can opener to add holes to the top for steam release.
- Step 5: Place the can inside the cavity of the chicken, ensuring it stands upright. Optional: Stuff the cavity with fresh herbs for extra flavor.
- Step 6: Position the chicken on the grill, away from direct heat. Cover and cook for approximately 1 hour to 1 hour and 15 minutes.
- Step 7: The chicken is done when the internal temperature reaches 165°F (74°C) in the thickest part of the thigh.
- Step 8: For extra crispy skin, move the chicken over direct heat for the final 5-10 minutes.
- Step 9: Carefully remove the chicken from the grill and let it rest for 10 minutes before carving.
Previous Recipe: Easy Honey-Glazed Drumsticks with Sweet & Spicy Sauce: A Family Favorite!
Next Recipe: Easy & Delicious Quick Chicken Salad Sandwich Delight: A Family Favorite Recipe!