Fried Chickpea Patties with Herb Blend
Wondering how to make the best Fried Chickpea Patties with Herb Blend? They're crispy, flavorful, and perfect for a quick snack or dinner. Let me show you my tips!

- Crispy Fried Chickpea Patties with Fresh Herb Blend: A Divine Snack!
- Essential Ingredients Guide
- look into Into Professional Cooking: Mastering Fried Chickpea Patties
- Pro Tips & Secrets: Elevate Your Chickpea Patties
- Perfect Presentation: Make Your Patties Pop
- Storage & Make-Ahead: Keeping It Fresh
- Creative Variations: Time to Switch It Up
- Complete Nutrition Guide: What's on Your Plate?
- Expert FAQ Solutions: Got Questions?
- Recipe Card
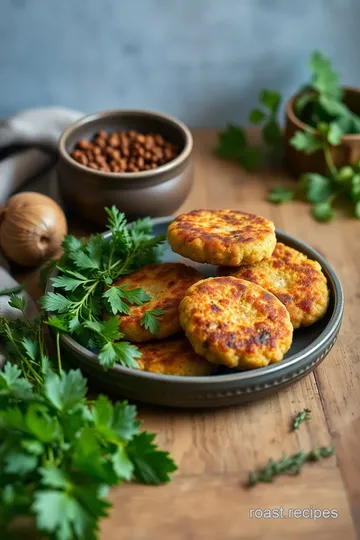
Crispy Fried Chickpea Patties with Fresh Herb Blend: A Divine Snack!
Oh my gosh, have you ever found yourself staring at your pantry, wishing you had something delicious to snack on but not knowing what? that was totally me one rainy afternoon.
I was hungry, bored, and had a can of chickpeas looking back at me. that’s when i decided to whip up some fried chickpea patties with herb blend .
Let me tell you, these crispy treasures became an instant hit in my household!
Every time i make these chickpea patties , it feels like i'm hosting my own mediterranean party right in my kitchen.
The golden-brown, crunchy exterior paired with a flavor-packed interior, makes them seriously hard to resist. honestly, these are the kind of treats you’d want to munch on during a game night or just while binge-watching your favorite show!
A Taste of Heritage
So, where did this delightful mediterranean chickpea dish come from? well, chickpeas have been a staple in mediterranean cuisine for ages—think of them as nature’s golden nuggets! they’ve been celebrated for their nutritional benefits since ancient times.
Fast forward to today, and chickpeas are making a major comeback as people embrace plant-based appetizers . with just a few simple ingredients and techniques, you can create something totally divine!
Recipe Setup: Quick and Simple
Now, don’t let the thought of frying scare you. this recipe is categorized as easy and is perfect for home chefs of all skill levels.
You’ll need about 15 minutes for active prep, and after chilling the patties for about 30 minutes, it’ll only take another 10 minutes to get them golden and crispy in your skillet.
So, in under an hour, voilà! you’ve got yourself a hearty snack.
Cost-wise, it’s super friendly on the pocket. One can of chickpeas can yield about 8 patties, giving you around four servings. Plus, they’re a major steal compared to takeout!
Nutritional Powerhouse
Let’s talk about the health benefits of chickpeas . these little legumes are protein-rich snacks that provide a hefty dose of fiber and essential nutrients.
By making these gluten-free chickpea patties , you’re not only treating yourself but also keeping things wholesome and nourishing. if you're gearing up for a small gathering, these savory bites are perfect for impressing guests without the guilt!
Other than being a health-conscious choice, the herb-infused fried patties are bursting with flavor! you can serve them on special occasions, or even for a casual weeknight dinner.
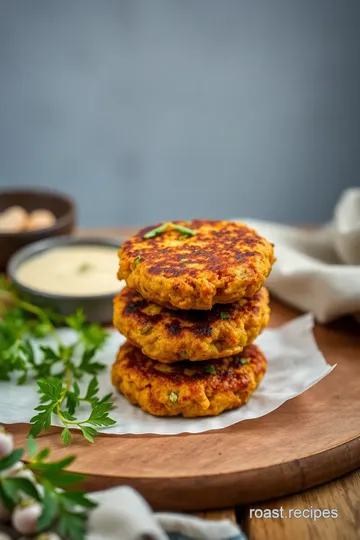
Trust me, they make killer appetizer ideas for parties ! pair them with a tangy tahini sauce for dipping, and i promise they’ll steal the show every single time.
Customization is Key
One of the coolest things about this chickpea recipe with herbs is its versatility. you can mix and match whichever fresh herbs you have on hand.
Throw in some mint for that refreshing twist, or even add a bit of chili for a spicy kick! the possibilities are endless, which makes it one of my go-to quick frying recipes .
But here's a tip: don't skip the chilling step. It’s like giving your patties a little spa day, helping them hold together nicely during frying.
Alright, are you ready to dive into the ingredients ? Grab your apron, and let’s make some magic happen! These flavorful vegetarian patties are calling your name!
Essential Ingredients Guide
Alright, my friends, let’s dive into the heart of cooking with chickpeas! wondering what makes your fried chickpea patties with herb blend sing? it’s all about the essential ingredients.
Let’s break it down step by step, and trust me, this will make your mediterranean chickpea dish pop !
Premium Core Components
First up, let’s talk measurements. for the fried chickpea patties , you'll need one can (15 oz) of chickpeas, which is about 425 grams .
Make sure those little guys are rinsed and drained. and if you prefer fresh, go for about 1 ¾ cups of cooked chickpeas .
Now, about quality. look for chickpeas that are firm and not mushy—freshness matters! a quick tip: check the expiration date on the can if you’re going that route.
Storage? keep your dried chickpeas in a cool, dry place, and they’ll last for ages. canned ones? they last about 3-5 years unopened in the pantry.
But once you crack that can open, you’ve got about 3 days from the fridge.
Signature Seasoning Blend
Let’s spice things up! the secret to my crispy chickpea fritters lies in the seasoning. for this recipe, you’ll need cumin, paprika , and fresh herbs like parsley and cilantro.
Herb-infused fried patties are all about that fresh taste! when you’re selecting herbs, go for vibrant colors and a fresh smell—that’s how you know they’ll kick some serious flavor.
And if you’re feeling adventurous, toss in some mint or dill. it’ll bring a whole new vibe to your dish.
You might even find yourself making these for your next party as a delicious appetizer idea!
Smart Substitutions
Now, don’t freak out if you find you're missing an ingredient. In cooking, improvisation is key! Don’t have breadcrumbs ? Ground oats work great as a substitute.
Is your pantry void of chickpeas? try using any other bean, like black or white beans. for those keeping an eye on diet, you can skip the egg altogether and use a splash of water mixed with flaxseed meal as a binder.
It’s a total lifesaver!
Kitchen Equipment Essentials
For creating those vegan chickpea patties , you don’t need to go all out on fancy gear. a simple large mixing bowl and a non-stick skillet are must-haves.
If you have a food processor, sweet! it’ll make mixing everything quicker and easier. but hey, if not, a fork or potato masher will do.
Remember to chill your patties before frying. that's a little trick i learned the hard way—trust me, it keeps them from breaking apart in the hot oil.
And don’t forget to have paper towels handy to absorb that excess oil. We want crispy, not greasy, right?
Making Your Chickpea Experience Great
So, whether you’re whipping up these crispy chickpea fritters for a family dinner or a cozy snack, remember: ingredients matter! with every bite, you’ll be savoring a flavorful vegetarian dish filled with protein-rich goodness.
Got your ingredients ready? Perfect! Grab your apron, and let’s make some magic happen in the kitchen. In the next section, we’re diving into the step-by-step instructions for those delicious chickpea patties that’ll be the star of your meal!
look into Into Professional Cooking: Mastering Fried Chickpea Patties
So, you’re in the kitchen, ready to whip up some fried chickpea patties with herb blend ? awesome choice! these little goodies are not just crispy chickpea fritters , but also packed with protein and flavor.
But before diving straight into frying, let’s chat about some professional cooking methods that’ll turn your home kitchen into a culinary playground.
Essential Preparation Steps
First off, let’s talk mise en place . this french term basically means “everything in its place,” and trust me, it's a game-changer.
Chop your red onion , parsley , and cilantro ahead of time. rinse and drain those chickpeas and get your breadcrumbs set.
It makes everything smoother, like a pro chef on a cooking show!
Now, let’s tackle time management . take a clock with you, or set a timer on your phone for each step.
For this recipe, you’ll need 15 minutes of prep time, 30 minutes chilling, and then just 10 minutes of cooking.
Keeping on track means you won’t end up in a last-minute panic.
Don’t forget about organization strategies ! lay out all your ingredients before you start. it’s so much easier to grab things when they're right there instead of rummaging around.
Plus, it keeps your mind clear. and, safety first! keep your workspace tidy and watch out for those slippery floors.
Trust me, nobody enjoys cleaning up a mess, or worse, a kitchen accident.
Step-by-Step Process
Let’s break this down into some yummy instructions:
-
Prepare Ingredients : Rinse and drain 1 can (15 oz) of chickpeas. Finely chop 1/4 cup each of red onion, parsley, and cilantro.
-
Mix it up : in a large bowl, combine your chickpeas, breadcrumbs, onion, garlic, parsley, cilantro, 1 tsp cumin, and 1/2 tsp paprika.
For an extra binding action, you can toss in 1 beaten egg .
-
Mash and Shape : Grab a fork or a potato masher and mash the mixture until it’s slightly smooth but still has some texture. Form those little babies into 2-inch patties.
-
Time to Chill : Place the patties on a parchment-lined plate and pop them in the fridge for 30 minutes . This helps solidify them for frying.
-
Heat Things Up : In a non-stick skillet, add enough oil for frying and heat it over medium. You want it shimmering, but not smoking—think 350° F .
-
Fry, Baby, Fry : Drop in your patties, but don’t overcrowd the pan. Fry for 3- 4 minutes on each side until they turn golden brown.
-
Drain and enjoy : take the patties out and let them rest on some paper towels to soak up the excess oil.
Serve them warm with some tangy tahini sauce for dipping , and you’re golden!
Expert Techniques
Okay, let’s get a bit more advanced. here’s where the magic happens! temperature control is key: if your oil isn’t hot enough, the patties will absorb too much oil and become soggy.
If it’s too hot, they’ll burn. so, lean on that thermometer and keep it steady!
Also, let’s chat about timing precision . if you lose track and leave the patties in for too long, you’ll end up with burnt bites instead of flavorful plant-based appetizers .
Keep an eye out for visual cues—you’re looking for that golden-brown goodness!
Success Strategies
Want to serve these crispy treats without a hitch? here’s the scoop. avoid common mistakes like skipping the chilling step, which helps the patties hold their shape.
Quality assurance? ensure every patty is roughly the same size. this allows for even cooking.
Feeling like meal prep? these gluten-free chickpea patties can be made ahead! store them in the fridge for up to 3 days or freeze them for a quick meal later.
Reheat in the oven to keep that crispiness intact!
Cooking should be fun, right? Go ahead and customize! Swap out herbs, or give it a spicy kick. These flavorful chickpea dishes are all about your taste.
And just like that, you’ve got yourself a mouthwatering dish to impress family or friends. Now that you’re all set to conquer the kitchen, let’s explore some additional information to elevate your frying skills!
Pro Tips & Secrets: Elevate Your Chickpea Patties
So you've decided to dive into the kitchen for some fried chickpea patties with herb blend ? awesome choice, my friend! let’s talk about some pro tips to make your cooking experience a breeze.
First off, chill those patties ! before frying, let them sit in the fridge for about 30 minutes. this helps the patties firm up and keeps them from falling apart in the oil.
Trust me, waiting that half-hour is well worth the crispy result!
Now, about frying—keep your oil temperature just right. you want it hot enough to sizzle when the patties hit the pan.
If it’s too cool, they’ll soak up the oil like a sponge and become greasy. but watch out! too hot, and you'll have burnt edges.
Aim for a medium heat and a beautiful golden brown in about 4 minutes per side.
Flavor enhancement alert! don’t be shy when it comes to herbs and spices . fresh cilantro, parsley, and a bit of cumin will give your patties pizzazz.
If you want to play around, toss in some dried chili flakes or a sprinkle of lemon zest for that zesty kick!
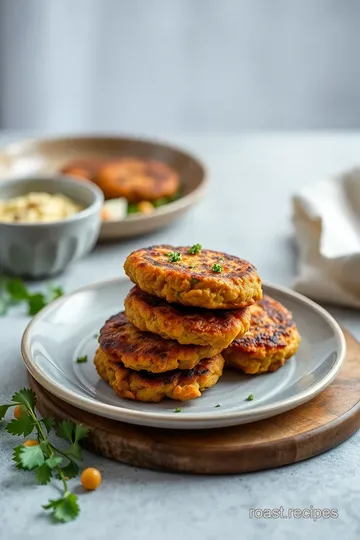
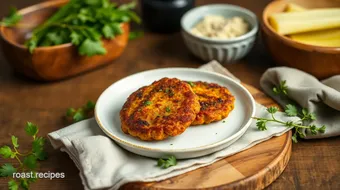
Lastly, presentation matters! When serving, place your crispy patties on a colorful plate next to a vibrant salad. It’s all about that visual appeal !
Perfect Presentation: Make Your Patties Pop
Okay, let’s be real—food that looks good tastes better. Plating these Mediterranean chickpea dishes can take them from merely delicious to Instagram-worthy.
To start, arrange your fried patties in a circle or a neat stack. sprinkle some fresh herbs on top—like a little green crown! a drizzle of tahini sauce adds a creamy touch and tantalizes the eye too.
For that extra touch, a few cherry tomatoes or colorful bell peppers can break the monotony.
Think color when garnishing. Bright greens, reds, and yellows make your dish just pop! When everything looks fresh and lively, it sets the mood and makes guests more excited about digging in.
Storage & Make-Ahead: Keeping It Fresh
Life gets busy, and sometimes you need to whip up meals ahead of time. good news! these crunchy vegetable patties store well.
Place any leftovers in an airtight container in the fridge; they’ll last for about 3 days . just reheat them in the oven for a few minutes to get that crunch back!
Freezing is an option, too! you can freeze the un-fried patties on a baking sheet until solid, then stack them in a bag.
When you’re ready to enjoy, fry them straight from the freezer—just add a few extra minutes to the frying time, and you’re golden! seriously, no one will guess you made them days ago.
Creative Variations: Time to Switch It Up
The beauty of this chickpea patties recipe lies in its flexibility. feel free to switch it up! want a spicy kick ? toss in some chopped jalapeños or a pepper of your choice; bring that heat.
If you’re after something unique, how about adding crumbled feta cheese? it gives these herb-infused fried patties a savory twist.
Love to cook with seasonal ingredients? try adding in some diced zucchini or roasted red peppers based on what’s fresh at your local farmers' market.
And for my vegan pals, just skip the egg; they’ll still hold together beautifully! It’s a homemade falafel alternative that everyone will love—guaranteed.
Complete Nutrition Guide: What's on Your Plate?
So let’s chat chickpeas for a second. did you know they’re a protein-rich snack loaded with fiber? yup! each serving of these vegetarian patties boosts your day and fills you up without weighing you down.
A simple breakdown shows about 180 calories per serving—making it a healthy choice while being a plant-based appetizer too!
Chickpeas are also fantastic for gut health, and their nutrients help regulate blood sugar. With these flavorful chickpea dishes , you're not just feeding your stomach; you're fueling your body right!
Expert FAQ Solutions: Got Questions?
Running into cooking conundrums? no worries! if your patties feel too crumbly, add a bit more chickpea mash or an extra splash of water.
If they’re breaking apart while frying, it might be that your oil wasn’t hot enough or try forming firmer patties.
And if you want them to taste even better? Let them chill before frying. Remember, a little waiting can turn those patties into crispy, flavorful charmers.
In conclusion, these fried chickpea patties with herb blend are not just a meal; they’re an experience. simple, delicious, and totally customizable! when you whip these up, don’t forget to relish every bit of the process.
Happy cooking, my friend! enjoy every bite!
Fried Chickpea Patties with Herb Blend Card
⚖️ Ingredients:
- 1 can (15 oz) chickpeas, rinsed and drained (425 g)
- 1/2 cup breadcrumbs (60 g)
- 1/4 cup red onion, finely chopped (40 g)
- 2 cloves garlic, minced
- 1/4 cup fresh parsley, chopped (15 g)
- 1/4 cup fresh cilantro, chopped (15 g)
- 1 tsp ground cumin (2 g)
- 1/2 tsp paprika (1 g)
- Salt and pepper, to taste
- 1 egg, beaten (optional for binding)
- Oil for frying (such as vegetable or canola)
🥄 Instructions:
- Step 1: Rinse and drain the chickpeas. Finely chop the onion, parsley, and cilantro.
- Step 2: In a large bowl, combine chickpeas, breadcrumbs, chopped onion, minced garlic, parsley, cilantro, cumin, paprika, salt, and pepper. Add the beaten egg for binding if using.
- Step 3: Use a fork or potato masher to mash the mixture until slightly smooth but still chunky. Form the mixture into small patties (about 2 inches in diameter).
- Step 4: Place the patties on a parchment-lined plate and refrigerate for 30 minutes to firm up.
- Step 5: In a skillet, heat oil over medium heat until shimmering.
- Step 6: Carefully place the patties in the skillet without overcrowding. Fry for 3-4 minutes on each side until golden brown and crispy.
- Step 7: Remove patties from the skillet and place them on paper towels to drain excess oil. Serve warm with dipping sauce or a fresh salad.
Previous Recipe: How to Bake Toasted Bread with Tomatoes & Fresh Basil - A Rustic Delight
Next Recipe: How to Bake Yams with Spiced Maple Glaze Delight: A Cozy Favorite!